
If you live in an apartment and you want compost for your plants without a yard, a worm bin is the one system I keep coming back to. I started mine on a third-floor balcony because I was tired of tossing coffee grounds and lettuce stems into the trash, and I wanted something I could actually use on my potted herbs. The first bin I built, though, was a disaster: I used a sealed tub with no air holes, dumped in a week of kitchen scraps at once, and within four days it smelled like a dumpster on a hot day. A neighbor knocked on the door. I almost gave up on the whole idea. Once you understand what worms actually need — air, damp bedding, and a slow, steady trickle of food — a worm bin is quiet, nearly odorless, and fits under the kitchen sink. In this guide I’ll walk you through the exact setup I use now, including the mistakes that almost got me evicted.
Quick answer: a beginner worm bin is a drilled plastic storage tub with 4 to 6 inches of damp, shredded-paper bedding, stocked with about one pound of red wiggler worms (Eisenia fetida) and fed a small handful of fruit and vegetable scraps once or twice a week. The three things that keep it from smelling are: never let the bedding dry out or flood, bury food under an inch of bedding, and feed little and often rather than dumping a week of scraps at once. Done right, a worm bin in an apartment produces a tablespoon of odor-free castings per worm per month and costs under $40 to set up. Everything below explains why each step matters.
- 1. Choosing and Setting Up Your First Worm Bin
- 2. Bedding: What Worms Actually Live In
- 3. Which Worms (and Where to Get Them)
- 4. What to Feed Your Worms (and What to Skip)
- 5. Keeping the Bin From Smelling or Attracting Pests
- 6. Harvesting the Castings
- 7. Using Worm Castings in Your Apartment Garden
- 8. Common Beginner Mistakes (and What I Got Wrong)
- 9. Troubleshooting: Symptoms, Causes and Fixes
- 10. FAQs
- 11. Sources and Further Reading
Choosing and Setting Up Your First Worm Bin
Why a worm bin works in a small apartment
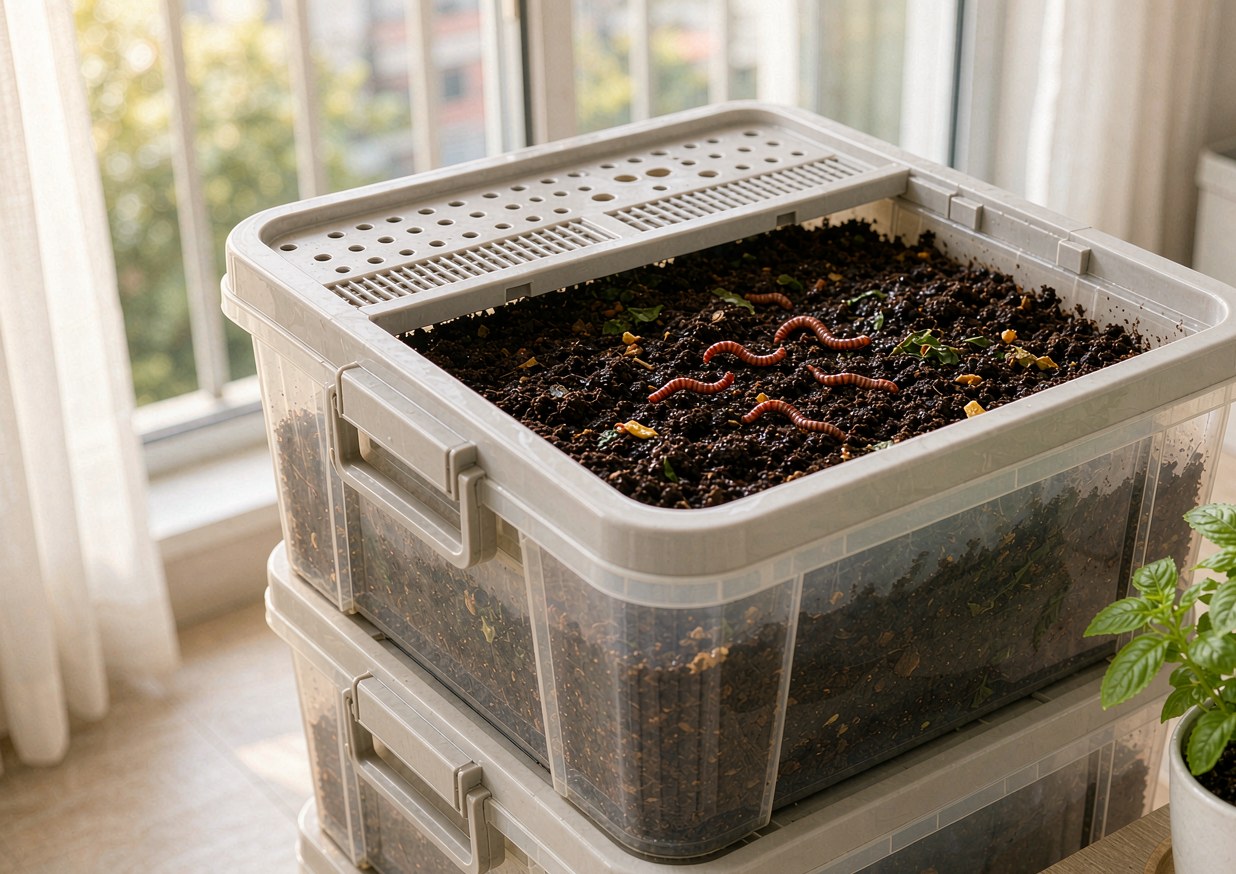
A worm bin (also called vermicomposting) is the only composting method I’d recommend for a rental with no outdoor space, and there’s a practical reason for that. Unlike a hot compost pile, which needs a cubic-yard heap and a yard, a worm bin runs at room temperature in a tub the size of a cat litter box. The worms do the turning for you, so you never fork or aerate a pile. In my 600-square-foot apartment the bin sits on a shelf in the utility closet, and nobody who visits knows it’s there until I mention it.
I like worm composting for apartment living because the output is immediate and usable. A tumbler outside takes months and a lot of volume; a worm bin gives you a spoonful of finished castings every time you check, and that’s exactly what a windowsill herb garden needs. The catch is that worms are living animals, not a machine — they tolerate a range of conditions but they’ll let you know fast when something’s wrong. My rule now is to treat the bin like a low-maintenance pet: check it weekly, don’t overfeed it, and keep it out of direct sun and freezing drafts. Do that and it hums along for years. Even though it felt intimidating at first, the setup is genuinely beginner-proof once you’ve drilled the holes.
Picking the right bin (size, material, drilling)
When you’re choosing a container, a 10- to 18-gallon plastic storage tub is the sweet spot for one person or a couple. It holds enough worms to eat your scraps without taking over a closet. Avoid metal and untreated wood: metal can react with the slightly acidic bin, and raw wood wicks moisture and rots within a season.
So how do you actually build it? Start with a lid you can drill, because air is the whole game. I drill a grid of 8 to 12 quarter-inch holes around the top edge of the tub and a row along the lid, then set the whole thing on a plastic tray to catch the occasional drip. One year I bought a “compost bin” that was really just a lidded pail with no holes, and that’s the exact bin that stank — anaerobic conditions build up in a sealed container, and the smell is the warning. A $12 tub from a big-box store, drilled correctly, performs better than any fancy kit I’ve tried. Material matters too: opaque plastic keeps light out (worms hate light) and holds humidity steadier than glass. Match the size to your scrap volume — a single person rarely needs more than 15 gallons — and you’ll never feel cramped.
Bedding: What Worms Actually Live In
Shredded paper and cardboard vs. coconut coir
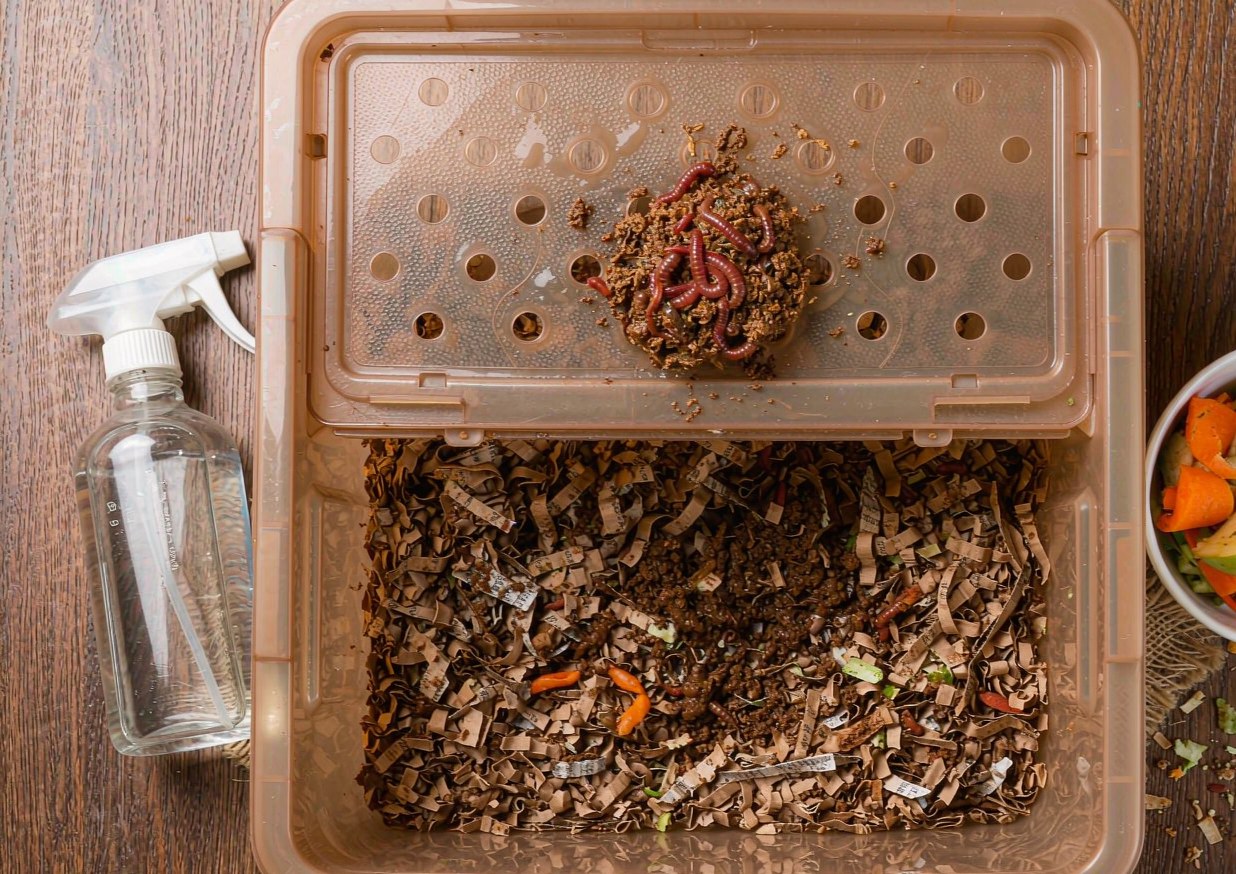
Everything in a worm bin lives in the bedding, not the food. Bedding is the damp, fluffy material worms burrow through and nibble between meals, and it does three jobs at once: it holds moisture, it gives the worms something to grip, and it buffers odors by staying aerobic. My default is shredded newspaper and plain cardboard — free, renewable, and the worms process it slowly so it lasts for months.
Here’s a question for you: would you rather use paper or buy a specialty product? My answer is paper for everyday, with a bag of coconut coir as backup. Coconut coir (the brick you soak in water) holds water better than paper and doesn’t compact, which is useful in a dry apartment with the heat on. But coir costs money and ships in plastic, so I only reach for it when I’m starting a fresh bin or rescuing a dried-out one. The best bedding I’ve found is a mix: two parts shredded paper, one part torn cardboard, and a handful of finished compost from a previous batch to seed the microbial life. That combination stays springy and never mats into a sludge the way pure paper can. Give your worms that and they settle in within a day.
Moisture and pH: the two numbers that matter
The decisive factor in a healthy bin is moisture. Worms breathe through their skin, and they can only do that if their world is damp — think of a wrung-out sponge, not a puddle. Too dry and they desiccate; too wet and the bin goes anaerobic and smells.
Most weeks I squeeze a fistful of bedding and look for a drop or two of water, never a stream. If it’s bone dry I mist it with a spray bottle; if it’s sopping I stir in more shredded paper. pH is the second number, and it’s easier than it sounds: worms like it near neutral, roughly 6 to 7. Acid builds up if you feed too many citrus peels or let food rot on top, and the bin will start to smell like vinegar. I keep pH in range by burying food, avoiding big dumps of oranges and tomatoes, and adding a sprinkle of plain garden lime only if the bedding looks sour. The University of Illinois Extension composting guide has a plain-language walkthrough of these basics that I still reread. Get moisture and pH right and you’ll avoid almost every problem new worm-keepers hit.
Which Worms (and Where to Get Them)
Red wigglers, not earthworms
If you go digging in your yard for worms, you’ll probably pull up nightcrawlers or earthworms — and they are the wrong animal for a bin. Those burrow deep into soil and hate confinement and rich food; put them in a tub of scraps and they’ll climb the walls or die. The worm you want is the red wiggler (Eisenia fetida), a surface-dwelling composting worm that thrives in decaying matter.
I learned this the hard way: my first “bin” was stocked with worms I’d found under a rock, and within a week they’d all piled up trying to escape through the air holes. Red wigglers, by contrast, cluster happily in the bedding and ignore the walls. They’re smaller, reddish, and they reproduce fast in a bin — a healthy population doubles every few months without you doing anything. You can order red wigglers by the pound online (look for a bait-and-tackle or vermicomposting supplier) or find a local keeper giving away a cupful. The Michigan State University composting basics page explains the species difference clearly if you want the biology. Choose the right worm and the bin practically runs itself.
How many worms to start with
In any worm bin, population follows food. A useful rule of thumb is about one pound of worms (roughly 1,000 worms) for every half-pound of food scraps you generate per day. For a single apartment that’s usually a one-pound starting batch, which eats a normal person’s vegetable prep waste comfortably.
Most years I start with a single pound of red wigglers in a 15-gallon tub, and that’s plenty for one cook. If you generate more scraps — a family of four, say — go to two pounds rather than overfeeding a small herd. The risk of too few worms is a backlog of food that rots on top; the risk of too many is a hungry bin where worms escape in search of more. A friend of mine over-ordered three pounds for a studio and spent a month watching worms migrate toward the kitchen — funny, but not what you want. Start with one pound, let the population find its own level, and add more only if you consistently run out of room for scraps. Watch the balance and you’ll land on a setup that matches your actual kitchen.
What to Feed Your Worms (and What to Skip)
A simple weekly feeding routine
When you feed a worm bin, the decisive factor is consistency. A small, steady trickle of scraps keeps the bin aerobic and the worms busy; a giant dump creates a wet pocket that goes anaerobic. I feed mine once or twice a week, never more than the worms clear in a few days.
Here’s the routine I actually follow. I keep a lidded “worm bucket” in the fridge for scraps: carrot peels, apple cores, coffee grounds, tea bags, wilted lettuce, squash ends. Twice a week I dig a small pocket in the bedding, drop in a cup or two of that mix, and smooth bedding back over it. The EPA’s home composting page lists the fruit-and-vegetable scraps that break down fast and are safe for worms. That cadence — little and often — is what turned my stinky first bin into the odor-free one I have now. I also chop scraps smaller with a knife or blend them; smaller pieces disappear in days instead of weeks. Build the habit and you stop thinking about it.
Foods that slow the bin down or smell
The most common feeding mistake is giving worms things they can’t handle. Meat, dairy, oily food, and cooked leftovers rot instead of composting in a cold worm bin, and they attract pests and stink within days. Citrus, onions, and garlic are borderline: a little is fine, a lot acidifies the bin and worms avoid it.
I avoid meat and dairy entirely in my apartment bin — one forgotten chicken bone turned a corner of the bedding into a maggot nursery, and I’m not repeating that. Onions and garlic I add only in tiny amounts, because they’re also the foods that can be toxic to a curious pet (more on that below). Big chunks of broccoli stalk or corn cob take forever and can ferment; I chop or skip them. The cleaner your input, the cleaner your bin: stick to fruit and vegetable trimmings, coffee, tea, and plain paper, and the worms stay ahead of the load. If you skip the problem foods, you’ll get a bin that smells like damp earth at most, never like garbage.
Keeping the Bin From Smelling or Attracting Pests
The cover-and-bury method
Once your worm bin is running, how you place the food matters as much as what you feed. Scraps left on top invite fruit flies and start to smell as they rot in the open air. The fix is the simplest possible habit: always bury the food.
I dig a fresh pocket each feeding and pull bedding over the scraps so nothing sits exposed. That one move — cover and bury — eliminated the fruit flies that plagued my early bin. It also keeps the surface dry and less inviting to gnats, and it forces the worms up into the fresh food rather than letting a wet mat form on top. A friend of mine never buried anything and wondered why her bin swarmed; ten minutes of burying fixed it. Add a loose layer of damp newspaper on top as a “blanket” and you get extra insurance against both smell and flies. Follow that habit and you’ll have a bin a roommate will never complain about.
Fruit flies, gnats and pet safety
If your bin is in an apartment, pest and pet control decides whether it stays or goes. Fruit flies are the usual nuisance, and they show up when food is exposed or the bin is too wet. The non-chemical controls work: bury food, keep the top dry, and set a small dish of apple-cider vinegar with a drop of dish soap nearby to trap the adults.
On the pet side, this is where I draw a hard line, because a worm bin sits in a kitchen where a dog or cat can reach it. Onion, garlic, and anything chocolate that ends up in scraps is toxic to pets, and a bin lid left ajar is an open invitation. I keep the bin lidded and on a shelf, and I never put cooked or sweet scraps (raisins, chocolate, onion-heavy leftovers) in at all. If you share the apartment with an animal, check every scrap against the ASPCA toxic and non-toxic plant and food list before it goes in, and keep the lid snapped shut. This is general pet-safety information, not veterinary advice — I’m not a vet. If you think a pet has eaten something from the bin, call your veterinarian or the ASPCA Animal Poison Control Center at (888) 426-4435 rather than waiting to see. Handle pests and pets right and the bin is safe in any home.
Harvesting the Castings
Three ways to separate worms from castings
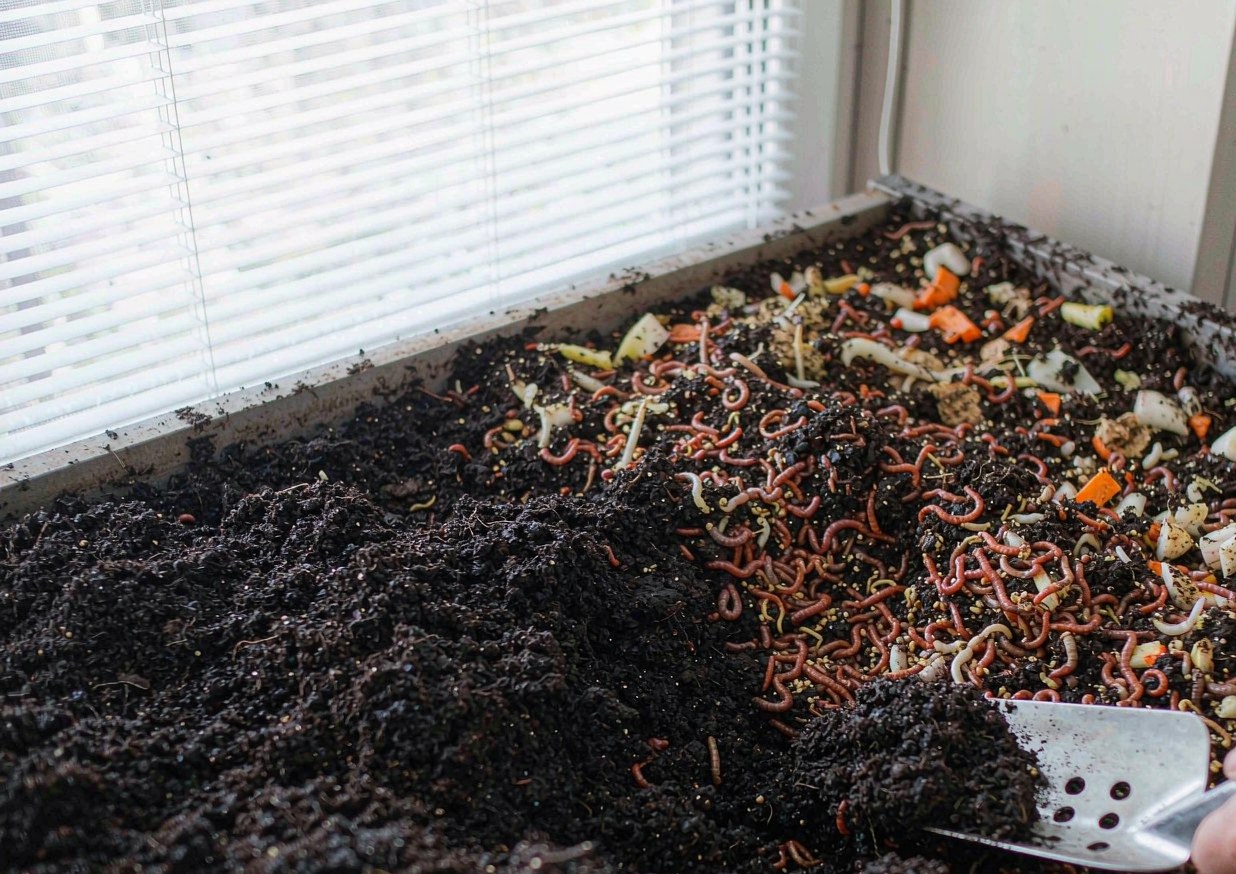
When the bin is mostly dark, crumbly castings and few whole scraps remain, it’s harvest time. The job is to separate the worms from the finished material, and there are three methods, from lazy to thorough. The dump-and-sort method is fastest: tip everything onto a tarp under a bright light, pile it into cones, and the worms dive away from the light so you can scrape off the clean castings from the outside.
I use the side-to-side migration method most often because it’s low-effort: I push the finished castings to one side of the bin, refill the empty side with fresh bedding and food, and over a week or two the worms migrate to the new food, leaving the old side worm-free to scoop out. The third option is a stacking tray system, where you add a fresh tray on top and the worms climb into it, leaving the bottom tray full of castings. Each approach works; the migration method suits a single tub best and saves my back. The Oregon State Extension gardening resources cover vermicompost harvest timing in plain terms. Pick the method that fits your bin and harvesting stops being a chore.
When and how often to harvest
The frequency of harvest follows how full the bin gets. In a healthy apartment bin you’ll harvest a portion every one to three months, not on a fixed calendar. You harvest when the bottom layer is mostly uniform dark castings and you can’t tell the food from the soil anymore.
On my schedule I pull a quart of castings every six to eight weeks during the warm months and slow down in winter when the worms are sluggish. Over-harvesting stresses the worms; under-harvesting lets castings pile up and crowd them. A simple signal: if you lift the bedding and see more dark crumbs than worms, take some out and refresh the bedding. One year I let a bin run nine months untouched and the worms had eaten most of their own bedding, which is how I learned to harvest on sight, not on the date. Harvest on the bin’s cues and the population stays happy and productive.
Using Worm Castings in Your Apartment Garden
Dilting castings into a gentle fertilizer
If you want the most from your castings, don’t dump them straight on plants in a thick layer — they’re concentrated. Worm castings are a mild, complete fertilizer, richer in available nutrients than most bagged compost, but they’re best used as a soil amendment or a weak liquid feed.
My go-to is worm-tea: a tablespoon of finished castings steeped in a quart of water for a day, then strained and poured onto pots. It’s gentle enough for seedlings and gives leafy herbs a visible boost within a week. The Michigan State compost-use guide notes that finished compost and castings improve soil structure as much as they feed plants, which matches what I see on my balcony. I brew a batch every couple of weeks in a repurposed jar and use it instead of synthetic fertilizer on my herbs. Make it a weak brew and you get the benefit without burning tender roots.
Top-dressing pots and seedlings
For container plants, the easiest win is a thin top-dressing: a quarter-inch of castings scratched into the top of the potting mix. Water carries the nutrients down, and you never risk over-concentrating.
I top-dress my basil, mint, and lettuce pots monthly through the growing season, and that single habit is why my windowsill herbs outlast the store-bought ones. Seedlings get a pinch sprinkled around them at transplant, never piled on the stem. A friend tried mixing castings 50/50 into a seed-starting tray and the mix was too rich — the seedlings legged out and flopped, so learn from that one. A little castings goes a long way; think seasoning, not the main ingredient. Top-dress lightly and your apartment garden closes the loop from scrap to harvest.
Common Beginner Mistakes (and What I Got Wrong)
Overfeeding and the soggy bin
The most common beginner error is feeding faster than the worms eat. Scraps pile up, the bedding saturates, and the bin tips into anaerobic rot. My very first bin failed this exact way — I came home from a big cooking weekend and buried a whole week of scraps at once.
When I overfeed now, I catch it by smell: a healthy bin smells like earth; a backed-up one smells sour. The fix is to stop feeding for a week, stir in shredded paper to soak up moisture, and only resume when the previous food is gone. I once rescued a soggy bin by pulling out the wettest clumps, mixing in dry cardboard, and leaving the lid ajar for a day — it recovered in a weekend. The lesson: feed to the worms’ pace, not your scrap pile’s. Keep the input modest and you’ll never face the rotten-bin emergency that almost ended my worm-keeping.
Letting the bin dry out or freeze
The second mistake is the opposite extreme — forgetting the bin exists. In a heated apartment the bedding dries fast, and in a cold one the worms can freeze. Both are slow deaths that show up as worms clustered, thin, or gone.
I learned the drying lesson during a two-week trip when the heat was on and nobody misted the bin; I came back to a cracked, papery bedding and half my worms shriveled. Now I check moisture every time I feed and mist if it’s dry. For cold, I keep the bin indoors through winter — a balcony in freezing weather needs insulation or a move inside, because red wigglers stall below about 55°F and die near freezing. A friend kept hers on an uninsulated porch in January and lost the whole herd. Keep the bin damp and above 55°F and the worms ride out any season you throw at them.
Troubleshooting: Symptoms, Causes and Fixes
Most worm-bin problems show up within two weeks, and nearly all trace back to one of six causes. This is the table I wish I’d had on day one.
| Symptom | Likely cause | Fix |
|---|---|---|
| Bin smells like rot or sulfur | Too wet and overfed; anaerobic pocket | Stop feeding, add dry shredded paper, loosen bedding, leave lid ajar a day |
| Fruit flies around the bin | Food left exposed on the surface | Bury all food under bedding; keep a dry paper blanket on top; set a vinegar trap |
| Worms climbing the walls | Too wet, too acidic, or overcrowded | Check moisture, cut citrus/onion, add bedding, split or thin the herd |
| Bedding is bone dry and worms thin | Neglected; low humidity | Mist with water, mix in damp coir, resume weekly checks |
| Maggots or ants in the bin | Meat/dairy added, or bin too dry outside | Remove offending food, keep lid sealed, raise bin off the floor |
| Castings not building up | Too few worms for the scrap load | Add another pound of red wigglers, or reduce how much you feed |
FAQs
Will a worm bin smell up my apartment?
Not if it’s managed right. A properly run worm bin smells like damp earth at most, because the bedding stays aerobic and the food is buried. The stink only appears when scraps rot on the surface or the bin floods and goes anaerobic — which is exactly what my first, un-drilled tub did. Drill air holes, keep the bedding damp-not-wet, bury food under an inch of bedding, and feed little and often. Do those four things and the bin is odorless enough to sit in a closet. If you ever catch a sulfur or sour smell, stop feeding for a week and stir in dry paper; it clears within days.
What can I not put in a worm bin?
Skip meat, dairy, oily food, and cooked leftovers — they rot instead of composting in a cold bin and draw pests. Go easy on citrus, onions, and garlic (a little is fine, a lot acidifies the bin and worms avoid it). Avoid anything salty or processed. On the pet-safety side, never add onion, garlic, or chocolate scraps if an animal can reach the bin, because those are toxic to dogs and cats. Stick to fruit and vegetable trimmings, coffee grounds, tea bags, and plain paper and cardboard. Keep the input clean and the bin stays clean, productive, and safe in any home.
How many worms do I need to start?
About one pound of red wigglers (roughly 1,000 worms) for a single person or couple, which comfortably eats normal vegetable-prep waste. A family of four should start closer to two pounds rather than overfeeding a small herd. The population self-regulates to your food supply and doubles every few months on its own, so you rarely need to buy more. The mistake is ordering too many for a tiny space — they’ll migrate looking for food. Start with one pound in a 15-gallon tub, let the worms find their level, and add more only if you consistently run out of room for scraps.
Is a worm bin safe if I have a cat or dog?
Yes, with two rules. First, keep the bin lidded and on a shelf the animal can’t tip or open, because the scraps inside can include pet-toxic foods like onion and garlic. Second, never put cooked or sweet scraps (raisins, chocolate, onion-heavy leftovers) in the bin at all. Check any questionable scrap against the ASPCA toxic and non-toxic list before it goes in. This is general pet-safety information, not veterinary advice — I’m not a vet. If you think a pet has eaten something from the bin, call your veterinarian or the ASPCA Animal Poison Control Center at (888) 426-4435. Follow those two rules and the bin is safe in a pet household.
How long until I get compost I can use?
You’ll see finished castings in as little as six to eight weeks in a warm bin, and you can harvest a portion every one to three months after that. The timeline depends on worm count, temperature, and how finely you chop the food — smaller pieces disappear faster. Don’t wait for a “finished” date on a calendar; harvest when the bottom layer is uniform dark crumbs and you can’t tell food from soil. My bin gives me a quart of castings every six to eight weeks in summer and slows in winter. Harvest on the bin’s cues, not the date, and you’ll keep a steady supply for your plants.
Sources and Further Reading
- U.S. EPA — Composting at Home
- University of Illinois Extension — Composting
- Michigan State University — Composting Basics for the Home Composter
- Oregon State University Extension — Gardening
- ASPCA — Toxic and Non-Toxic Plants and Foods List
About the author
Samantha has been gardening and arranging her own cut flowers for more than ten years, and has built more than 30 centerpieces from grocery-store bunches, clippings off the cedars behind her house, and a handful of dollar-store experiments that didn’t work. She writes practical, low-cost guides for beginners, including the versions that failed. Prices quoted in her articles are what she actually paid at US grocery and craft stores; nothing is sponsored and no brand pays for a mention. She is not a certified florist, a veterinarian or a horticulturist, and says so wherever a topic touches on plant safety or pet health.
Published: Oct 28, 2026 · Last updated: Oct 28, 2026.
{
“@context”: “https://schema.org”,
“@graph”: [
{
“@type”: “Article”,
“headline”: “Worm Bin Composting for Apartments: A Beginner Setup That Does Not Smell”,
“description”: “A beginner worm bin is a drilled plastic tub with damp shredded-paper bedding and red wiggler worms, fed a small handful of fruit and vegetable scraps once or twice a week; bury food, keep it damp, and it stays odorless indoors.”,
“image”: [
“images/worm-bin-hero-clean.jpg”,
“images/worm-bin-materials-clean.jpg”,
“images/worm-bin-process-clean.jpg”
],
“author”: { “@type”: “Person”, “name”: “Samantha” },
“publisher”: { “@type”: “Organization”, “name”: “Samantha” },
“datePublished”: “2026-10-28”,
“dateModified”: “2026-10-28”,
“mainEntityOfPage”: {
“@type”: “WebPage”,
“@id”: “https://gmmur.com/2026/10/28/worm-bin-composting-apartments-beginner-setup”
}
},
{
“@type”: “FAQPage”,
“mainEntity”: [
{
“@type”: “Question”,
“name”: “Will a worm bin smell up my apartment?”,
“acceptedAnswer”: {
“@type”: “Answer”,
“text”: “Not if it is managed right. A properly run worm bin smells like damp earth at most, because the bedding stays aerobic and the food is buried. Drill air holes, keep the bedding damp-not-wet, bury food under an inch of bedding, and feed little and often. If you catch a sulfur or sour smell, stop feeding for a week and stir in dry paper; it clears within days.”
}
},
{
“@type”: “Question”,
“name”: “What can I not put in a worm bin?”,
“acceptedAnswer”: {
“@type”: “Answer”,
“text”: “Skip meat, dairy, oily food, and cooked leftovers, because they rot instead of composting in a cold bin and draw pests. Go easy on citrus, onions, and garlic. Avoid salty or processed food. Stick to fruit and vegetable trimmings, coffee grounds, tea bags, and plain paper and cardboard. Never add onion, garlic, or chocolate scraps if a pet can reach the bin, since those are toxic to dogs and cats.”
}
},
{
“@type”: “Question”,
“name”: “How many worms do I need to start?”,
“acceptedAnswer”: {
“@type”: “Answer”,
“text”: “About one pound of red wigglers for a single person or couple, which eats normal vegetable-prep waste. A family of four should start closer to two pounds. The population self-regulates to your food supply and doubles every few months on its own. Start with one pound in a 15-gallon tub and add more only if you consistently run out of room for scraps.”
}
},
{
“@type”: “Question”,
“name”: “Is a worm bin safe if I have a cat or dog?”,
“acceptedAnswer”: {
“@type”: “Answer”,
“text”: “Yes, with two rules: keep the bin lidded and on a shelf the animal cannot tip or open, and never put cooked or sweet scraps such as raisins, chocolate, or onion-heavy leftovers in it. Check any questionable scrap against the ASPCA toxic and non-toxic list. This is general pet-safety information, not veterinary advice: if a pet eats something from the bin, call your veterinarian or the ASPCA Animal Poison Control Center at (888) 426-4435.”
}
},
{
“@type”: “Question”,
“name”: “How long until I get compost I can use?”,
“acceptedAnswer”: {
“@type”: “Answer”,
“text”: “You will see finished castings in six to eight weeks in a warm bin, and can harvest a portion every one to three months after that. The timeline depends on worm count, temperature, and how finely you chop food. Harvest when the bottom layer is uniform dark crumbs and you cannot tell food from soil, rather than on a fixed date.”
}
}
]
}
]
}