
If you’ve got a small vegetable bed and you’re still hauling a watering can back and forth every evening, let me save you the trouble I put myself through. The first season I grew tomatoes in a 4×8 raised bed, I killed a third of my basil by flooding the bed — I ran a soaker hose with no pressure regulator, set a cheap timer, and walked away for a long weekend. When I came back the soil was a swamp, the lower leaves were yellow, and the mosquitoes had moved in. That was the year I finally installed a drip irrigation kit, and it’s the single change that turned evening watering from a chore into a non-event. In this article I’ll walk you through exactly how I set up a drip system for a small vegetable bed, the parts you actually need, the layout mistakes I made so you don’t have to, and the seasonal schedule that keeps things alive without wasting water. Everything below is from my own backyard, including the parts that didn’t work.
Quick answer: a drip irrigation kit for a small vegetable bed comes down to five things — a backflow-safe faucet connection, a pressure regulator, a timer, a half-inch main line laid down each row, and 1-gallon-per-hour (GPH) emitters spaced about 12 inches apart at each plant. You connect it to an outdoor spigot, run the line down the bed, punch in emitters, then water for roughly 30–45 minutes every other morning in summer (less in spring and fall). The whole thing costs $40–$90 for a typical 4×8 bed and pays for itself in saved water and saved evenings. The three mistakes that waste the most water are skipping the pressure regulator, burying the line where you can’t find leaks, and running it at midday when half the water evaporates. Everything below explains the why.
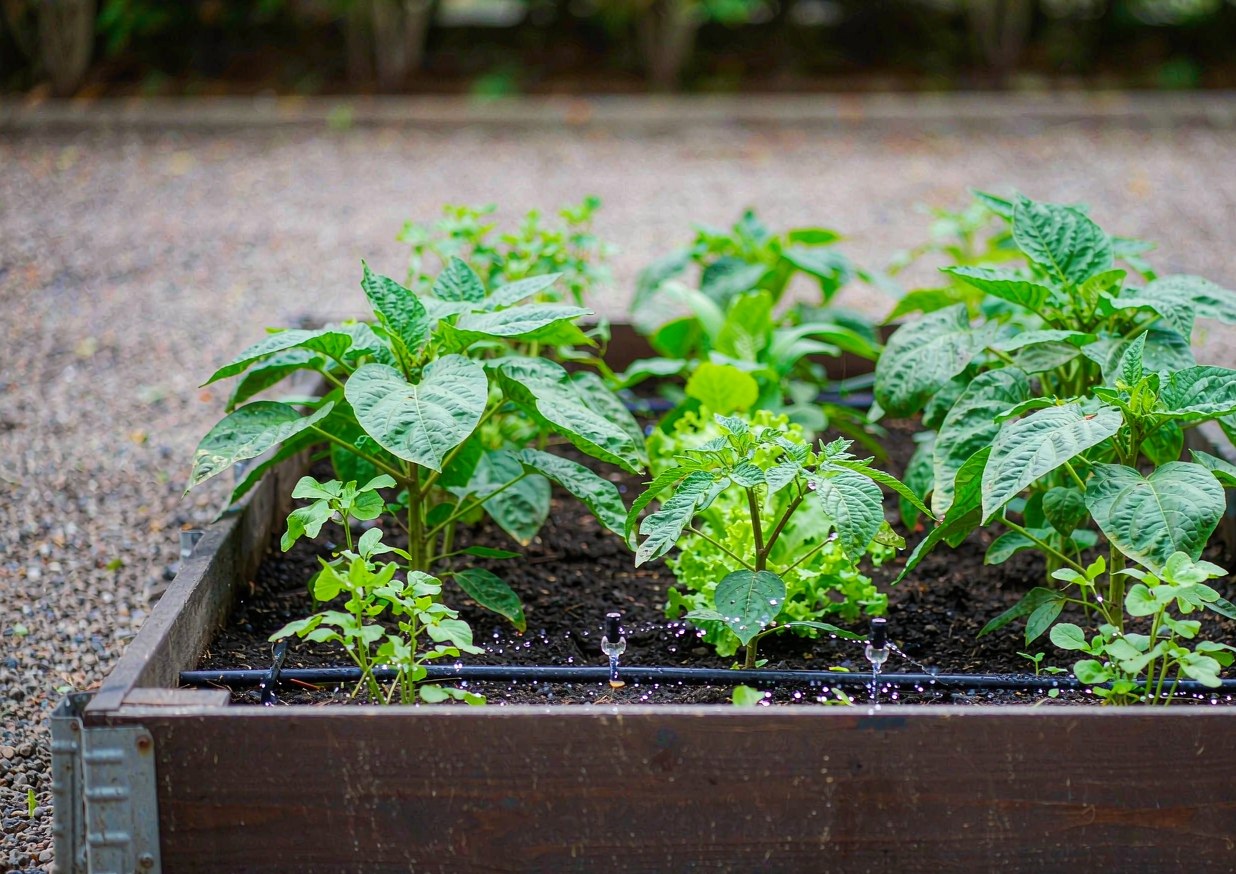 A small vegetable bed running on drip irrigation.
- 1. What a Drip Irrigation Kit Actually Includes
- 2. Picking the Right Kit Size for a Small Bed
- 3. Mapping Your Layout Before You Cut Anything
- 4. Connecting to the Faucet and the Timer
- 5. Laying the Main Line and Emitters
- 6. The First Run: Flushing and Checking for Leaks
- 7. Watering Schedules Through the Seasons
- 8. Common Setups and What They Cost
- 9. Troubleshooting: Symptoms, Causes and Fixes
- 10. FAQs
- 11. Sources and Further Reading
What a Drip Irrigation Kit Actually Includes
The parts you’ll unbox
When you open a typical drip irrigation starter kit, you’re looking at a short list of parts, and nearly all of them are reusable for years. The core pieces are a roll of half-inch polyethylene mainline tubing, a bundle of 1/4-inch feeder lines (sometimes called spaghetti tubing), a bag of button or drip emitters rated in gallons per hour, a pressure regulator, a hose-end backflow preventer, a faucet adapter, and a handful of end caps and goof plugs. Some kits throw in a mechanical or digital timer; others expect you to buy it separately, and I recommend buying it separately because the bundled timers are usually the weakest link.
I made the mistake early on of treating the bag of emitters as optional. My first “kit” was just mainline and end caps, and I figured the water would seep out along the length like a soaker hose. It didn’t — it dribbled out the open end and the tomatoes at the far end stayed bone dry. The emitters are the part that actually delivers water to the plant, so check the bag before you assume you’re done. A good starter kit for a 4×8 bed includes at least 10–15 emitters, enough mainline to reach every row twice over, and a pressure regulator sized for household water pressure.
What each piece actually does
It helps to know why each part exists, because once you understand the job, you can substitute or skip intelligently. The mainline is the half-inch tube that carries water from the faucet down the length of the bed; the pressure regulator drops your home’s 40–80 psi down to the 10–25 psi that drip parts are built for; the backflow preventer stops garden water from siphoning back into your drinking supply; and the emitters meter out a slow, precise trickle right at the root zone. Forget the regulator and the emitters can pop out of the line under pressure — I watched three of them blow off on my second attempt.
The timer is what makes the system hands-off, and the feeder lines let you branch water a foot or two off the mainline to reach a plant that isn’t sitting directly under it. The end caps close the end of the mainline so pressure builds, and goof plugs patch any hole you punch in the wrong spot. If you remember only one thing from this section, make it this: the pressure regulator and the backflow preventer are not upsells — they’re the difference between a system that works for five years and one that sprays your shoes on day one.
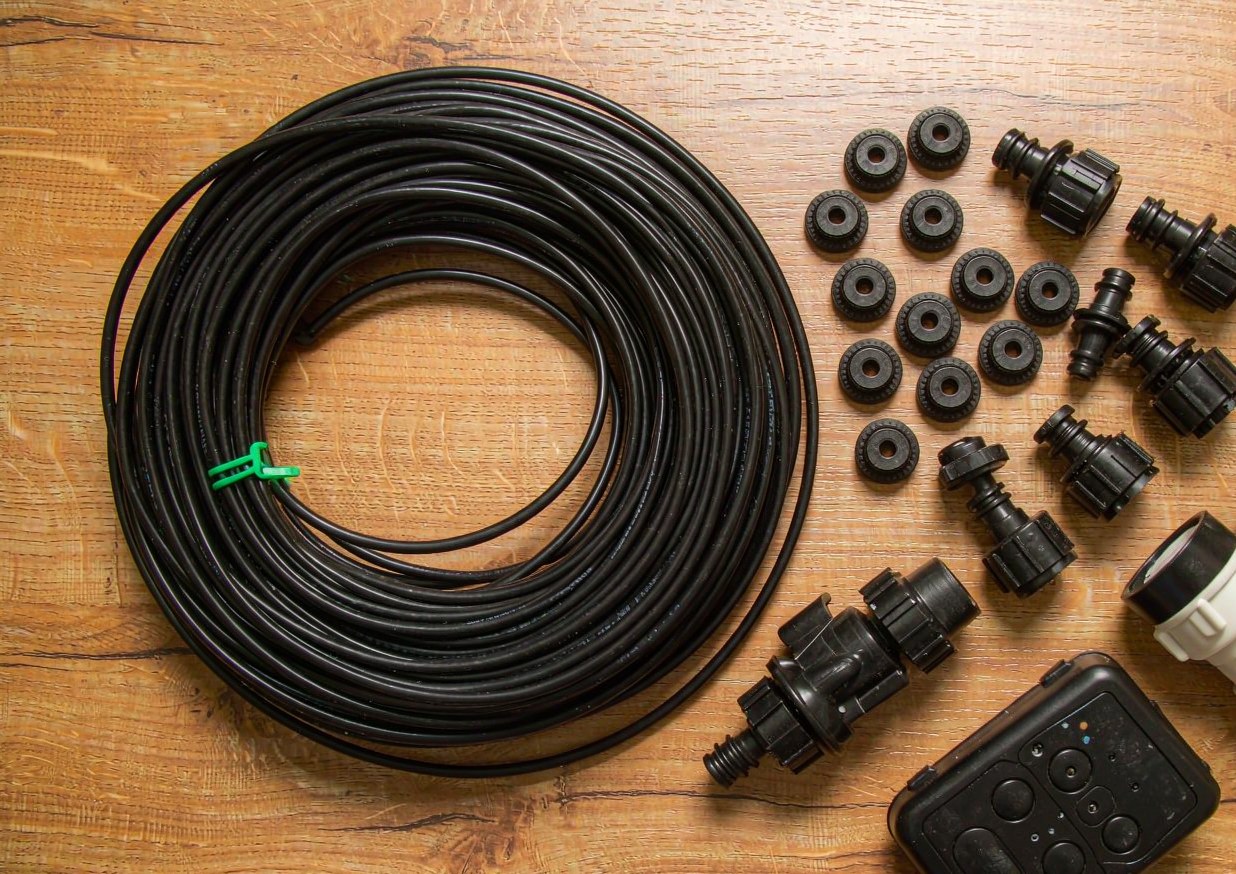 The parts that come in a typical drip irrigation starter kit.
Picking the Right Kit Size for a Small Bed
How I measured my bed
Sizing a kit is easier than it looks because the math is forgiving. Measure the length of each row you want to water, add them up, then add about 20% for bends and mistakes. My 4×8 bed has four 8-foot rows, so that’s 32 feet of mainline plus 6–8 feet of slack and connection, so I bought a 50-foot roll and had plenty left. If your bed is a single 10-foot row, a 25-foot kit is plenty. The number that matters most is total emitter count: count your plants and assume one emitter per plant, or two for anything that’s a heavy drinker like a tomato or squash.
One thing I got wrong the first time was buying a kit sized for a 100-foot row and trying to make it work on a tiny bed. The excess tubing coiled in a heap, trapped heat, and the pressure at the emitters was uneven. For a small bed, smaller is genuinely better — you want the line snug along the rows, not puddling in loops. When in doubt, buy the next size down and a separate roll of mainline; extra tubing is cheaper than a whole new kit, and you’ll use the scraps on containers.
Pressure regulators and why they matter
A pressure regulator is the small inline fitting that sits right after the faucet adapter, and it is the single most important part nobody mentions. Household water runs at 40–80 psi; drip emitters are designed for roughly 10–25 psi. Without a regulator, the line bulges, emitters spit instead of drip, and connections weep. I learned this the hard way when my unregulated line ruptured at a coupling and ran for two hours into the lawn while I was at work.
Match the regulator to your emitter rating — most kits use 25 psi regulators, which is the safe default. If your home pressure is unusually low (under 40 psi), a regulator can actually starve the system, so in that case you may run with just a backflow preventer and test the flow. The rule I use now: if the water from an emitter arcs more than a few inches, your pressure is too high and you need the regulator. It’s a $6 part that prevents a $40 mistake.
Mapping Your Layout Before You Cut Anything
Rows vs. a grid of squiggle lines
Before you cut a single tube, walk the bed and decide the layout on paper — or just in your head with a hose laid loosely on top. For row crops (tomatoes, beans, carrots), run the mainline straight down each row and drop emitters at every plant. For a mixed bed of scattered transplants, a grid of squiggle lines — mainline snaking in a zigzag so no plant is more than 6 inches from a tube — works better and uses less tubing than running a line per plant. I started with per-row lines and ended up with a zigzag because my beds are never as tidy as the catalog photos.
The reason to plan first is that every cut is permanent. Punch a hole in the wrong place and you patch it with a goof plug, but do that a dozen times and the line gets leaky. Lay the tubing loosely over the soil, step back, and confirm each plant has a line near its base before you commit. I once skipped this and discovered my pepper row was a foot from the nearest emitter; the peppers sulked all summer while the weeds between rows thrived.
Where to place the feeder line
The feeder line (the thin 1/4-inch tube) is how you reach plants that sit off the mainline — a solo squash at the corner, a potted herb on the edge. Keep feeders short, ideally under 2 feet, because long thin lines lose pressure fast and the plant at the end gets a trickle. I route the mainline as close to the plants as I can and use feeders only for the odd outlier.
Place emitters at the drip line of the plant — the circle on the soil directly under the outer edge of the leaves — not at the stem. Watering the stem invites rot and misses the roots that actually drink. For a tomato, that’s about 12–18 inches out from the base on both sides once it’s established, so I use two emitters per plant. If you only remember one placement rule, make it water the soil under the leaves, not the stalk, and you’ll avoid most of the fungal problems that come from wet foliage.
Connecting to the Faucet and the Timer
Backflow and the hose bib
The faucet connection is where most first-time leaks happen, so take it slow. Screw the backflow preventer onto the hose bib first, then the pressure regulator, then the timer, then the faucet adapter that the mainline pushes onto. Hand-tight is usually enough; over-tightening cracks the plastic threads, which I did on a cold morning when I thought tighter meant safer. Turn the water on briefly with the end of the mainline open to flush out any factory debris before you cap it.
A practical safety note worth stating plainly: outdoor timers and pumps draw power, and water plus electricity is a real hazard. Plug the timer into a GFCI-protected outlet, never a bare indoor extension cord run through a window, and keep the connection off the ground. This is general safety information, not professional electrical advice — if your setup needs more than a simple outdoor-rated timer on an existing GFCI outlet, have it looked at. The backflow preventer is a separate, non-negotiable piece: it keeps fertilizer- or soil-contaminated water from siphoning back into your drinking water, which matters the moment you add any liquid feed to the tank.
Setting a simple timer schedule
A timer turns the whole project from a daily chore into a set-and-forget system, but the schedule is where beginners overwater. I run mine for 30 minutes, every other day, starting at 5 a.m. in summer. Watering in the early morning means the leaves dry before nightfall (fewer fungal issues) and less evaporates in the heat. Avoid midday runs — I calculated once that on a 90°F afternoon roughly half the water was gone to evaporation before it reached the roots.
Start conservative and adjust by watching the plants, not the clock. If the top inch of soil is still damp at the next cycle, skip a day; if it’s cracked and the plants are wilting by noon, add a cycle. The beauty of drip is precision: you’re delivering a known trickle to a known spot, so the timer is just a way to repeat a good decision automatically. For spring and fall, I cut the run time roughly in half because the plants are smaller and the air is cooler.
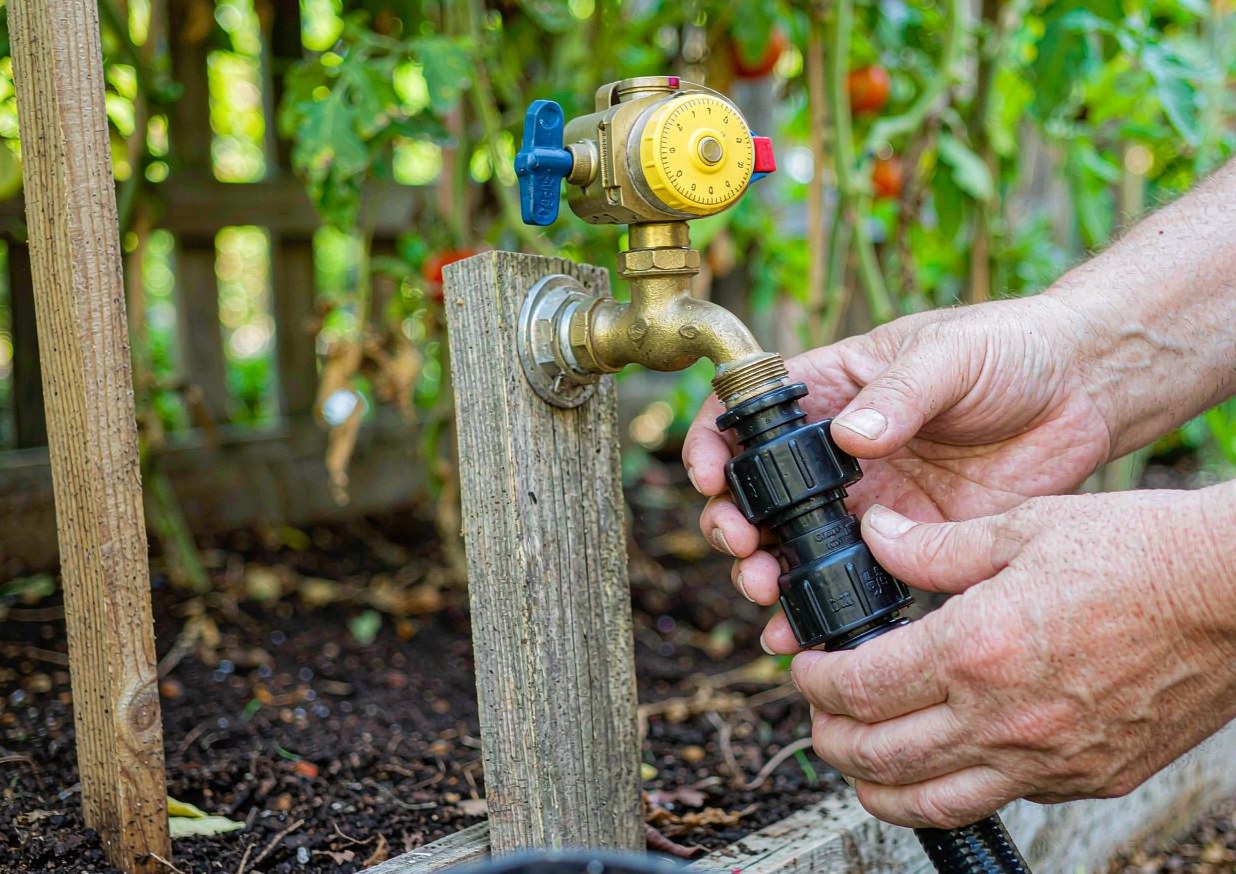 Connecting the drip line to the faucet and timer.
Laying the Main Line and Emitters
Spacing emitters for vegetables
Emitter spacing depends on what you’re growing, but a reliable default for a mixed vegetable bed is one 1-GPH emitter every 12 inches along the mainline. Heavy drinkers — tomatoes, cucumbers, squash, eggplant — get two emitters each, spaced on either side of the base. Light drinkers like lettuce, herbs, and radishes do fine on a single emitter shared between two plants. I keep a small bag of extra emitters and just add them as I plant, rather than trying to predict the exact layout in spring.
The trap here is too few emitters, not too many. A bed that looks watered from above can be bone dry two inches down if the emitters are too far apart, and vegetables with shallow roots suffer first. I poke a finger into the soil a few hours after the first real run to confirm the moisture reached the root zone; if it hasn’t, I add emitters or lengthen the run. A simple moisture check beats any schedule guess.
How many gallons per hour to use
Most beginner kits ship with 1-GPH emitters, and that’s the right call for a small bed — slow enough to soak in, fast enough to do the job in a reasonable window. A 30-minute run at 1 GPH delivers about half a gallon per emitter, which is roughly right for a mature vegetable plant in summer soil. If you’re in sandy soil that drains fast, step up to 2-GPH emitters or run longer; if you’re in heavy clay that pools, stay at 1 GPH and run shorter, more frequent cycles so the water doesn’t run off the surface.
I spent a season overthinking GPH and ended up mixing 0.5 and 2 GPH emitters on the same line, which watered unevenly and confused every adjustment I made. Keep one emitter rating per zone — it makes the math and the schedule sane. If your bed has wildly different needs (a water-loving celery next to a drought-tolerant rosemary), split them onto two short mainline branches off a manifold rather than mixing emitter sizes on one line.
The First Run: Flushing and Checking for Leaks
What a leak looks like
The first run is a test, not a watering, so do it while you can watch. With the end cap off, turn the water on for a minute to flush debris out of the line, then cap it and walk the whole bed looking for trouble. A leak at a coupling shows as a steady weep or a small jet; a blown emitter shows as a thin spray; and a line pierced by a stray goof plug shows as a fountain you’ll hear before you see. On my first proper run I found two emitters that had not seated and were misting the mulch instead of dripping — easy fixes, but only because I watched.
The reason to flush first is that manufacturing grit is the #1 cause of clogged emitters later. If you skip the flush, that grit travels to the smallest opening in the system — the emitter — and stays there. I now treat the flush as non-negotiable, and I re-flush in spring after the line has sat with stagnant water all winter. A clean first run means a quiet summer.
Fixing a clogged emitter
Even with a flush, an emitter will clog eventually, usually from mineral buildup or a speck of soil sucked back in when the line depressurizes. The fix is simple: pop the emitter out, rinse it, and press it back in, or swap it for a new one from your spare bag. I keep a dozen spares in the garden shed for exactly this. If the same spot clogs repeatedly, the line is drawing sediment there — check that the end cap and any low points aren’t collecting sludge, and consider a tiny bleed at the lowest point.
The bigger lesson is to make the line findable. I lay mine on top of the soil, not buried, for the first season, so I can see every emitter and every connection. Burying looks tidy but hides leaks until the plants tell you, by dying. Once I trust a layout, I tuck the line under a thin layer of mulch rather than soil, which hides it from the sun (UV shortens tubing life) without hiding it from me.
Watering Schedules Through the Seasons
Spring vs. summer run times
A fixed schedule is a beginner trap because plant water needs swing hard across a season. In spring, when transplants are small and the air is cool, a 15-minute every-other-day run is usually plenty. By July, with full-sized tomatoes transpiring in 90°F heat, that same bed wants 30–45 minutes, possibly daily. I treat the timer as a starting suggestion and adjust every couple of weeks by checking soil moisture rather than trusting the date.
The adjustment lever I use most is run length, not frequency. Deep, infrequent watering builds stronger roots than frequent sips, so I’d rather run 45 minutes every other day than 15 minutes daily. The exception is containers and seedlings, which dry out faster and prefer shorter, more frequent cycles. Keep the bed on one zone and the pots on another if you can — mixing them is how I once drowned the bed while the pots stayed thirsty.
Mulch and how it changes everything
The single biggest schedule-saver I added was mulch. A 2-inch layer of straw or shredded leaves on the bed cuts evaporation, keeps the soil cooler, and means I can often shave 10–15 minutes off every run. It also keeps the emitters from baking in the sun and stops soil from splashing onto leaves (fewer disease problems). I mulch right after laying the line, tucking it around the tubes so they’re shaded but still visible.
Mulch also smooths out the panic of a hot week. Without it, a heatwave means scrambling to add cycles; with it, the soil holds the morning’s water into the evening and the plants ride it out. If you do only one thing beyond the basic kit, mulch the bed — it’s cheaper than a bigger timer and does more for water savings than any emitter upgrade.
Common Setups and What They Cost
DIY kit vs. bought
A complete starter kit for a small bed — mainline, emitters, regulator, backflow preventer, and ends — runs about $35–$60 online or at a garden center. Add a decent digital timer for $15–$30 and you’re at $50–$90 all in. Buying the parts à la carte is only marginally cheaper and takes longer to spec, so for a first system I’d buy the kit and a separate timer. The reusable parts (tubing, regulator, preventer) last many seasons; only emitters and the timer wear out, and both are cheap.
I compared the kit route to hiring it done and there’s no contest for a small bed — a professional drip install quotes $300+ for a few rows, which only makes sense for a large landscape. For one or two beds, DIY is faster and cheaper and you learn the system well enough to fix it yourself. The one place I’d spend up is the timer: a $12 mechanical timer failed me mid-summer, while a $25 digital one has run three seasons without a hiccup.
When to upgrade to a bigger system
You’ll know it’s time to upgrade when you’re taping together three kits to cover the garden, or when you want automation beyond a single timer — a multi-zone controller, a rain sensor, or a fertilizer injector. I upgraded the year my beds passed six, switching to a manifold that splits the faucet into four zones so the thirsty vegetables, the herbs, the pots, and the new fruit trees each get their own schedule. That’s a $60–$120 leap, but it’s the natural next step rather than a first move.
Until then, resist the urge to overbuild. A small bed does not need a pressure-compensating master plan; it needs a line, some emitters, and a timer. I’ve seen beginners sink $200 into a system for two tomato plants and then spend more time maintaining it than watering would have taken. Start simple, earn the upgrade, and the system will match the garden as it grows.
Troubleshooting: Symptoms, Causes and Fixes
Most drip problems show up in the first two weeks, and nearly all trace back to one of six causes. This is the table I wish I’d had on day one.
| Symptom | Likely cause | Fix |
|---|---|---|
| Plants at the far end of the line are dry | Pressure too low or line too long for the regulator | Add a pressure regulator, shorten the zone, or split into two shorter lines |
| Water sprays out instead of dripping | No pressure regulator, or emitter not seated | Install/confirm the 25 psi regulator; push emitters firmly until they click |
| One plant wilts while neighbors are fine | Clogged or missing emitter at that spot | Pop out and rinse the emitter, or add a spare; check spacing |
| Puddle at a coupling | Loose or cracked connection | Hand-tighten; replace cracked fitting; confirm backflow preventer threads aren’t cross-threaded |
| Whole bed stays soggy | Run time too long or too frequent | Cut to 30 min every other day in summer; check soil before each cycle |
| Timer never turns on | Dead batteries or GFCI trip | Replace timer batteries; reset the GFCI outlet; test the outlet with a lamp |
FAQs
Do I really need a pressure regulator for a small bed?
Yes, and it’s the part most first-timers skip. Household water pressure runs 40–80 psi, while drip emitters are built for roughly 10–25 psi. Without a regulator the line can bulge, emitters pop out, and connections weep — I lost three emitters on an unregulated run before I learned the lesson. A 25 psi regulator costs about $6 and sits right after the faucet adapter. The only exception is a home with very low pressure under 40 psi, where you may run with just a backflow preventer and then test the flow; if the water arcs more than a few inches from an emitter, your pressure is too high and you need the regulator.
How long should I run drip irrigation for vegetables?
For a typical small bed with 1-GPH emitters, start with 30 minutes every other day in summer, 15 minutes every other day in spring and fall, and adjust by checking the soil rather than the calendar. The goal is moist soil down to the root zone, not a wet surface. I’d rather run 45 minutes every other day than 15 minutes daily, because deep infrequent watering builds stronger roots. Containers and seedlings are the exception — they dry out faster and prefer shorter, more frequent cycles, so keep them on their own zone if you can.
Can I bury the drip line underground?
You can, but I wouldn’t for the first season. Laying the line on top of the soil (or just under a thin layer of mulch) lets you see every emitter and connection, so leaks show up as a visible weep instead of a dead plant weeks later. Mulch also shades the tubing from UV, which extends its life, while still keeping it findable. Once you trust a layout, tuck it under mulch rather than soil. Burying in soil hides problems until the plants tell you, and digging to fix a leak disturbs the roots you were trying to help.
Is a drip system better than a soaker hose?
For a small, planned bed, I think drip is worth the small extra cost over a soaker hose. A soaker hose weeps along its whole length, so you can’t target individual plants, and it’s easy to overwater the rows while under-watering the corners — exactly the mistake that flooded my first bed. Drip puts a known amount of water at each root zone, which means less waste and fewer drowned plants. A soaker hose is cheaper and fine for a uniform hedge or a long narrow border, but for vegetables where every plant drinks differently, drip wins. Either way, use a timer so it’s not a daily chore.
How do I winterize a drip irrigation kit?
Before the first hard freeze, turn off the water at the faucet, disconnect the timer and backflow preventer, and open the end caps to drain the lines. I coil the tubing and fittings into the shed for winter; the polyethylene tolerates a freeze if it’s empty, but water trapped in a low spot can split it. In spring I re-flush the line for a minute before capping to clear any grit or stale water, then recheck every emitter. The regulator and timer are the parts most likely to fail from a hard winter, so I inspect them closely on reinstall — a $25 digital timer has outlasted two mechanical ones for me.
Sources and Further Reading
- Oregon State University Extension — Gardening
- Clemson University HGIC — Home & Garden Information Center
- Missouri Botanical Garden — Plant Finder
About the author
Samantha has been gardening and arranging her own cut flowers for more than ten years, and has built more than 30 centerpieces from grocery-store bunches, clippings off the cedars behind her house, and a handful of dollar-store experiments that didn’t work. She writes practical, low-cost guides for beginners, including the versions that failed. Prices quoted in her articles are what she actually paid at US grocery and craft stores; nothing is sponsored and no brand pays for a mention. She is not a certified florist, a veterinarian or a horticulturist, and says so wherever a topic touches on plant safety or pet health.
Published: Oct 22, 2026 · Last updated: Oct 22, 2026.
{
“@context”: “https://schema.org”,
“@graph”: [
{
“@type”: “Article”,
“headline”: “Drip Irrigation Basics: Set Up a Kit for a Small Vegetable Bed”,
“description”: “A beginner-friendly walkthrough of setting up a drip irrigation kit for a small vegetable bed: the parts, layout, faucet connection, emitter spacing, seasonal schedules, and the mistakes that waste the most water.”,
“image”: [
“images/drip-hero-clean.jpg”,
“images/drip-materials-clean.jpg”,
“images/drip-process-clean.jpg”
],
“author”: { “@type”: “Person”, “name”: “Samantha” },
“publisher”: { “@type”: “Organization”, “name”: “Gmmur” },
“datePublished”: “2026-10-22”,
“dateModified”: “2026-10-22”,
“mainEntityOfPage”: {
“@type”: “WebPage”,
“@id”: “https://gmmur.com/drip-irrigation-basics-small-vegetable-bed”
}
},
{
“@type”: “FAQPage”,
“mainEntity”: [
{
“@type”: “Question”,
“name”: “Do I really need a pressure regulator for a small bed?”,
“acceptedAnswer”: {
“@type”: “Answer”,
“text”: “Yes. Household water pressure runs 40–80 psi while drip emitters are built for about 10–25 psi. Without a regulator the line can bulge, emitters pop out, and connections weep. A 25 psi regulator costs about $6 and sits right after the faucet adapter. The only exception is very low home pressure under 40 psi, where you may run with just a backflow preventer and then test the flow.”
}
},
{
“@type”: “Question”,
“name”: “How long should I run drip irrigation for vegetables?”,
“acceptedAnswer”: {
“@type”: “Answer”,
“text”: “For a small bed with 1-GPH emitters, start with 30 minutes every other day in summer and 15 minutes every other day in spring and fall, then adjust by checking soil moisture rather than the calendar. Deep, infrequent watering builds stronger roots than frequent sips. Containers and seedlings dry out faster and prefer shorter, more frequent cycles on their own zone.”
}
},
{
“@type”: “Question”,
“name”: “Can I bury the drip line underground?”,
“acceptedAnswer”: {
“@type”: “Answer”,
“text”: “You can, but not for the first season. Laying the line on top of the soil or just under mulch lets you see every emitter and connection so leaks show as a visible weep instead of a dead plant. Mulch also shades the tubing from UV and extends its life while keeping it findable. Burying in soil hides problems until the plants tell you.”
}
},
{
“@type”: “Question”,
“name”: “Is a drip system better than a soaker hose?”,
“acceptedAnswer”: {
“@type”: “Answer”,
“text”: “For a small, planned bed, drip is worth the small extra cost. A soaker hose weeps along its whole length so you cannot target individual plants, and it is easy to overwater rows while under-watering corners. Drip puts a known amount of water at each root zone, which means less waste and fewer drowned plants. Either way, use a timer so watering is not a daily chore.”
}
},
{
“@type”: “Question”,
“name”: “How do I winterize a drip irrigation kit?”,
“acceptedAnswer”: {
“@type”: “Answer”,
“text”: “Before the first hard freeze, turn off the water at the faucet, disconnect the timer and backflow preventer, and open the end caps to drain the lines. Coil the tubing and fittings into storage for winter. In spring, flush the line for a minute before capping and recheck every emitter. Inspect the regulator and timer closely on reinstall, since those parts are most likely to fail from a hard winter.”
}
}
]
}
]
}