
The first time I repotted a root-bound houseplant, I grabbed it by the stems and pulled. The pot won, the plant lost: one main stem snapped off at the base, the plastic nursery pot cracked down the side, and a very healthy pothos dropped roughly half its leaves over the following fortnight out of what I now know was pure transplant shock. It survived, but it took a year to look like itself again. What I’d missed is that getting a root-bound plant out of its pot is not a pulling job — it’s a loosening job, and the roots circling the inside of the pot are the thing holding it in. Since then I’ve repotted somewhere north of a hundred plants, including a six-foot rubber tree I had to slide down a flight of stairs, and the method below has not broken one. In this article I’ll walk through it step by step, including the parts that go wrong. Ready? Let’s get yours out in one piece.
Quick answer: to repot a root-bound houseplant, water it the day before, then loosen the root ball by squeezing a flexible pot or running a knife around the inside edge of a rigid one. Tip the plant on its side, hold it by the root ball and the base of the stems together — never by the leaves — and slide it out. Tease or cut the circling outer roots so they point outward, then replant in a pot only 1–2 inches wider, at the same depth as before, in fresh mix. Water it in well, then keep it in bright indirect light and out of direct sun for two weeks with no fertilizer. That last part is the one people skip. Everything below explains why it matters.
- 1. Knowing When a Houseplant Is Actually Root-Bound
- 2. Choosing the Right Time to Repot
- 3. Picking the New Pot and Mix
- 4. Getting the Plant Out Without Breaking It
- 5. Dealing With the Roots Once It Is Out
- 6. Planting It Back at the Right Depth
- 7. Aftercare: The Two Weeks That Decide Everything
- 8. Big Plants, Broken Pots and Special Cases
- 9. Troubleshooting: Symptoms, Causes and Fixes
- 10. FAQs
- 11. Sources and Further Reading
Knowing When a Houseplant Is Actually Root-Bound
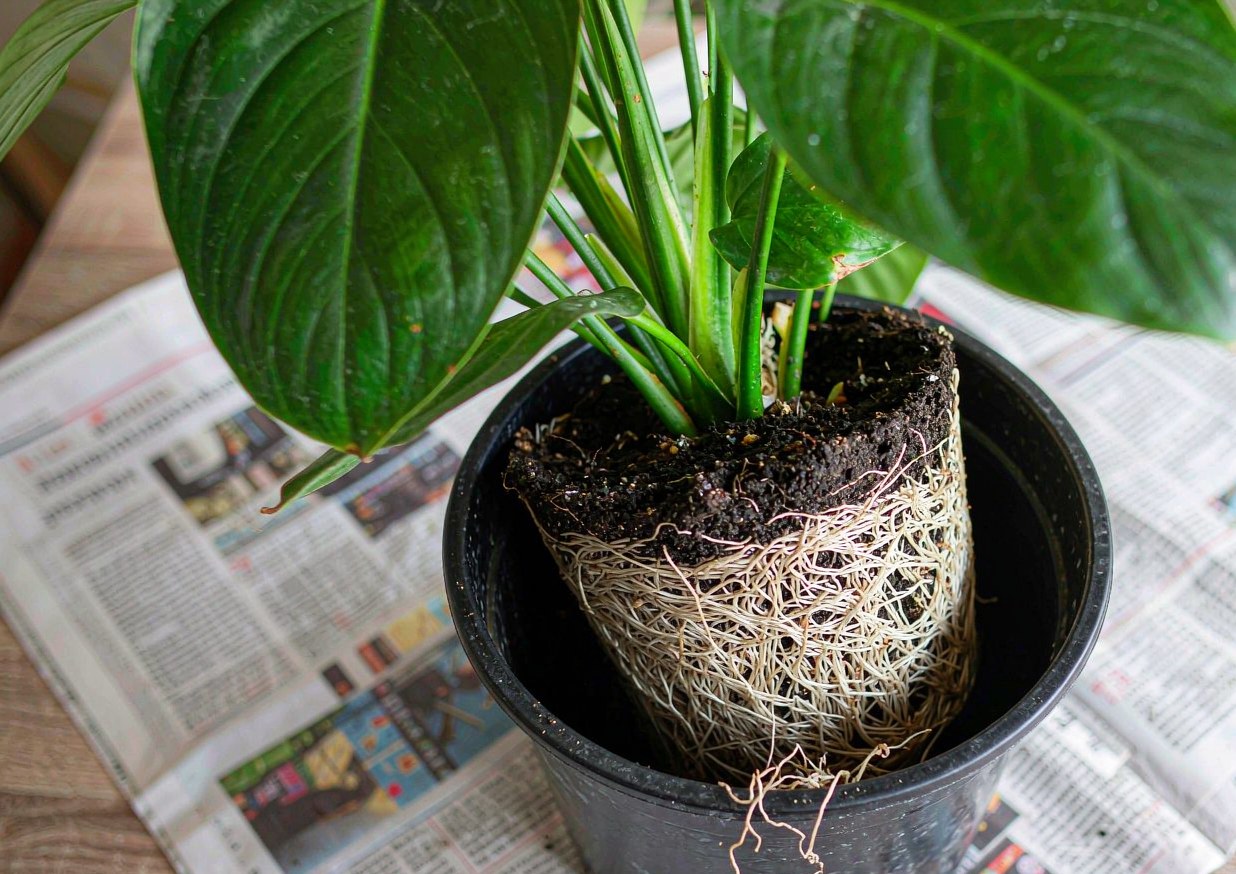
The five signs worth trusting
“Root-bound” describes a plant whose roots have filled the pot and started circling the inside wall, and the foliage symptoms are often the last thing to show up. By the time the plant looks unhappy, the root situation has usually been going on for a year.
The checks I run, in order of how much I trust them. First, and best of all: slide the plant out and look. If you see roots matted against the wall or poking out of the drainage holes, that’s your answer, and no guesswork is needed. Second, roots growing out of the drainage hole — visible from underneath without unpotting. Third, water running straight through the pot and out the bottom within seconds, because there’s more root than mix left to absorb it. Fourth, the plant drying out within a day or two of a thorough watering, which is the same problem seen from the other side. Fifth, stunted or yellowing new growth and a root ball that has pushed itself up out of the pot. Two or more of those and it’s time. What I’d add from experience: a plant can be genuinely root-bound and still look completely fine on top, which is why the lift-and-look is worth doing every spring regardless.
When it is NOT root-bound, and repotting will make it worse
This is the part most repotting guides leave out, and it’s where a lot of well-meant damage happens. Repotting is a stressful event, and doing it when the plant doesn’t need it costs more than it gains.
Skip it if the plant was repotted within the last year, unless it’s obviously bursting. Skip it if the plant is actively flowering or setting bud — you’ll drop the flowers, and I’ve done exactly that to a Christmas cactus. Skip it if the plant is already struggling with rot, pests or a disease problem: fix that first, because fresh mix and a bigger pot won’t cure root rot and will give the remaining healthy roots more wet mix to rot in. Also worth knowing is that some plants genuinely prefer being tight — many orchids, hoyas, snake plants and peace lilies will flower better slightly crowded, and a roomy pot just gives them wet mix and no blooms. And the failure mode I see most: putting a small plant into a much larger pot “so it has room to grow”. Oversized pots hold water the roots never reach, and the result is rot. The right question isn’t “does it need a bigger pot” — it’s “does it need a bigger pot now“.
Choosing the Right Time to Repot
Why spring and early summer win
The best window for repotting houseplants is spring through early summer, roughly March to June in the northern hemisphere. The reason isn’t magic — it’s that longer days and stronger light mean the plant is actively growing, and actively growing roots are the ones that heal and push into fresh mix.
Winter is the worst time. A plant repotted in December has almost no root growth to spare, so the damaged roots sit in damp fresh mix for weeks, which is precisely the environment that breeds rot. I repotted a monstera once in early November because it had outgrown its pot and I didn’t want to wait, and it sulked until March and lost two leaves. Same species, same method, repotted in April: new leaf within five weeks. The season did that, not my technique. If you’re in the southern hemisphere, flip those months. One useful trick for timing: repot just as you see the first new leaf or shoot of the year emerge. That’s the plant telling you it has energy to spare.
The three moments you should not wait for
Seasonality is a preference, not a rule, and there are three situations where you repot immediately whatever the calendar says.
First, root rot. If the roots are brown, soft and smelling sour, get the plant out today, cut the rot away and put it in fresh dry mix — waiting until spring will kill it. Second, a broken pot, or a pot that has cracked and is leaking mix and water everywhere. Third, pests in the soil: fungus gnats living in the top layer, or a soil-borne problem you can’t clear from the surface. In all three cases the plant is better off out of that pot now, and you can compensate for the bad timing by keeping it somewhere bright and warm and being careful with water for the first fortnight. I’d also flag a fourth: if you’ve just brought a plant home from a shop, it’s worth a look at the roots within a week or two even if the timing is wrong, because a lot of plants are sold already pot-bound in a pot one size too small.
Picking the New Pot and Mix
How much bigger to go, and why not much
The most common repotting mistake is going too big. The rule that has never let me down is 1–2 inches wider in diameter than the current pot — that’s it. For a plant in a 6-inch pot, go to an 8-inch one, not a 12-inch one.
Here’s why the restraint matters. Roots only take up water and nutrients from mix they’re actually in contact with, so a large ring of unused mix beyond the root ball stays wet, cold and low in oxygen long after a watering. That’s where rot starts, and it’s the reason a plant can look worse after being “given room to grow”. A bigger pot also means the plant spends its energy filling the pot with roots before it does anything visible above the surface, so you get months of no growth. The table below is the sizing I use.
| Current pot | Go to | Why |
|---|---|---|
| 3–4 in | 5–6 in | Seedlings and small herbs; small jumps only |
| 6 in | 8 in | The standard houseplant step |
| 8–10 in | 10–12 in | Established plants; consider root-pruning instead |
| 12 in + | Same pot | Too big to keep sizing up — root-prune and refresh the mix |
That last row is worth sitting with. Plants don’t grow indefinitely in pots, and at some point the right move is to keep the same pot, take the plant out, cut back the outer roots by a third, and put it back with fresh mix. That’s how you keep a 20-year-old plant in a pot you can still lift. Whatever size you choose, check that it has a drainage hole; if it doesn’t, use it as a decorative sleeve and keep the plant in a functional pot inside it.
Matching the mix to the plant
Fresh mix is half the point of repotting — old mix compacts, breaks down and loses structure, which is why a plant in three-year-old mix dries out unevenly and never quite thrives.
I keep three things on the shelf and blend to suit the plant. A general-purpose peat-free houseplant mix is the base for most foliage plants. Perlite or pumice gets added for anything that wants sharp drainage — snake plants, succulents, cacti, most hoyas — at roughly one part grit to two parts mix. Orchid bark gets added, generously, for aroids like monstera and philodendron, which want air around their roots far more than they want water-holding fines. What I never do is dig up garden soil; it compacts in a pot, drains badly and can carry pests. One practical note: dampen the mix before you use it. Dry mix out of the bag is hydrophobic, so water poured on afterwards runs down the inside of the pot and out the bottom without ever wetting the root ball — I’ve seen that confuse people into watering three more times.
Getting the Plant Out Without Breaking It
Loosening the root ball before you pull
This is the step that prevents almost every broken stem. The plant is held in its pot by friction and by roots gripping the wall, and pulling against that is what snaps things. Loosen first, then lift.
My sequence. Water the plant the day before, not the hour before — damp mix holds together in a ball instead of shedding off the roots, and slightly softened roots are less brittle. Then, for a flexible plastic nursery pot, lay it on its side and squeeze and roll the pot firmly all the way around, working from top to bottom, until you feel the root ball break contact with the wall. For a rigid terracotta or ceramic pot, run a thin knife, an old bread knife or a putty knife around the inside edge, pressing against the pot rather than into the roots. Then work a finger or the knife tip carefully into a drainage hole to break the suction at the base. If there’s a saucer, take it off first. The whole loosening stage takes under a minute and replaces the pulling entirely.
What to do when it will not come out
Occasionally the plant genuinely will not shift, and that’s the moment people start pulling harder. Don’t. There are three escalations, and the last one is a last resort.
First, tip it further — go past horizontal to maybe 45 degrees past it, so gravity is working for you, and rock it gently rather than hauling. Second, water it again and wait twenty minutes; a dry root ball can wedge against a tapered pot, and wetting it can free it. Third, and only for a plant you’re willing to sacrifice the pot for: cut the pot off. Plastic nursery pots cut easily with sturdy scissors or a knife down the side, and they’re worth a dollar. Ceramic and terracotta can be broken deliberately with a firm tap from a hammer at the rim, but wrap the plant in a towel first and wear eye protection — I’ve done this twice and both times it was the right call for a plant I’d had for years. What I would not do is pull on the stems or leaves. If the crown is the only thing you can grip, get someone to hold the pot while you work the root ball loose with a knife, or accept losing the pot.
Dealing With the Roots Once It Is Out
How much to tease apart, and where to cut
Once it’s out, you’ll see why it was stuck: a dense mat of roots circling the outside of the root ball. Left as-is and replanted, those roots will keep circling rather than growing outward into the new mix, which means the repot achieved very little.
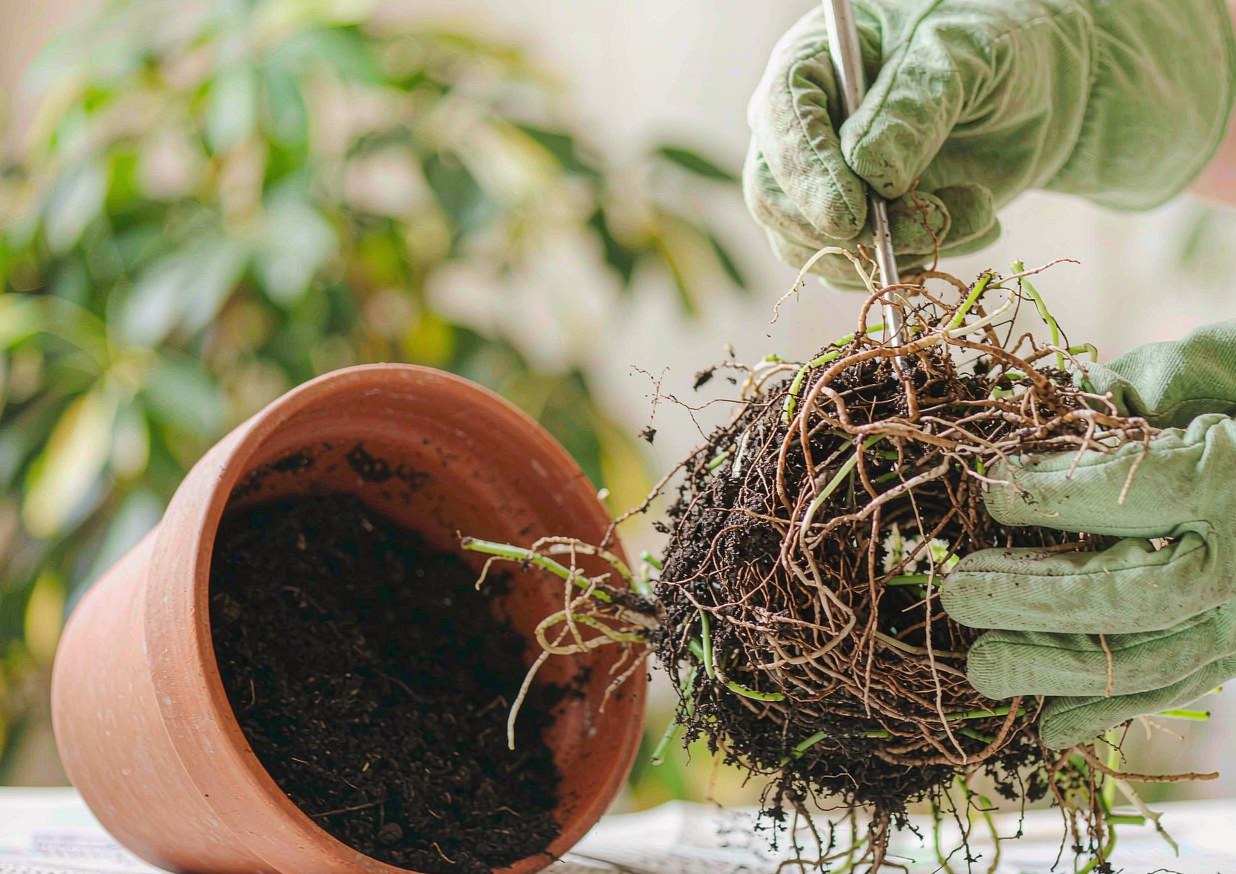
How far to go depends on how bad it is. For a mildly bound plant, I use my fingers to rake the outer roots loose and pull the mat down and outward, and that’s enough. For a severely bound plant — a solid root spiral with almost no mix visible — I use a clean sharp knife or pruners to make three or four vertical slices, about an inch deep, down the sides of the root ball, and also slice off the bottom inch or two where the worst coiling happens. That sounds brutal and it is mildly brutal, but it forces the plant to branch new roots into the fresh mix instead of continuing to girdle itself. A note on tools: clean and sharp matters. I wipe blades with alcohol first, because a ragged crush cut invites rot in exactly the place you can least afford it.
Roots you should never cut
Not all of that root mass is fair game, and cutting the wrong part turns a routine repot into a real problem.
Leave the thick structural roots near the crown alone — the ones that fan out from the base of the stem are what anchor the plant, and severing them can fell it. Leave fine feeder roots in the middle of the ball alone; they’re doing the actual water uptake, and the point is to redirect the outer ones, not to thin the whole system. Never remove more than about a third of the total root mass in one go, because the plant still has to support all of its existing leaves with what’s left, and over-pruning the roots is what causes dramatic collapse and leaf drop afterwards. And be careful around anything with a bulb, corm, rhizome or tuber — snake plant rhizomes, orchid pseudobulbs, peace lily crowns — where a careless slice cuts into the storage organ itself. A useful rule of thumb for the nervous: if you’re unsure whether to cut a root, don’t. Teasing apart achieves most of the benefit with none of the risk.
Planting It Back at the Right Depth
Setting the crown level and backfilling
Depth is the detail people get wrong most often, and both directions cause problems. The rule is simply: plant it at the same depth it was growing at before.
Too deep — burying the crown or the base of the stems — is the dangerous one, since it holds constant moisture against tissue that evolved to be in air, and stem rot follows quickly. Too shallow leaves the top of the root ball exposed, so those roots dry out and the plant sits unstable in its pot. Practically: put a layer of fresh mix in the bottom of the new pot, set the plant in, and check that the crown sits about an inch below the rim so there’s room to water. I do this by eye and then by hand — rest a finger across the rim and see where the crown falls. Then backfill around the sides in stages, firming gently with your fingers or tapping the pot on the bench to settle the mix and knock out air pockets. Don’t compact it hard; roots need air. Leave roughly an inch of headroom at the top for watering, and make sure no mix is piled against the stem.
Watering in, and the first two weeks
The first watering after repotting isn’t optional and it isn’t the same as a normal watering — it’s there to settle the mix into contact with every root.
Water slowly and thoroughly, in two passes rather than one, until water runs freely from the drainage hole. The first pass will often drain straight through the fresh mix; that’s normal, so go round again. Then let it drain fully and tip out anything that collects in the saucer. What I do not do is add fertilizer, rooting hormone, or any “starter” solution to that first watering — the roots are wounded, and fertilizer on wounded roots burns them. Fresh mix also usually contains enough feed for six weeks or so anyway. For the following two weeks, water only when the top inch or two is dry rather than on a fixed schedule, since a plant with a reduced root system drinks less than it used to. Keep it in bright indirect light, out of direct sun, and out of drafts. If you’ve done the root work properly, you’ll usually see new growth in three to six weeks.
Aftercare: The Two Weeks That Decide Everything
Light, water, and why you should not feed yet
The fortnight after a repot is when a plant either settles or collapses, and almost all of that is down to what you don’t do.
My rules for those fourteen days. Light: bright and indirect, and no direct sun — a plant with compromised roots can’t move water fast enough to keep up with a hot window, so sun exposure right after repotting is a common cause of sudden wilting. Water: only when the top inch or two is dry. Err slightly on the dry side, because the root system is temporarily smaller than the leaf area it’s supporting, so it drinks less than it did before. Food: nothing for at least six weeks. Heat: normal room temperature, away from vents and radiators. What I also skip is misting, which doesn’t meaningfully raise humidity and just keeps leaves wet. One thing worth resisting: the urge to check the roots again. Every peek out of the pot disturbs the new root hairs forming against the fresh mix.
Reading transplant shock versus real failure
Almost every plant looks a bit worse for a few days after a repot. Knowing which of those is normal and which is a genuine problem saves a lot of panic — and a lot of unnecessary second repottings.
Normal transplant shock is a day or two of slight wilting or drooping, one or two older leaves yellowing and dropping, and the plant looking generally unimpressed. It resolves on its own within a week or two as the roots re-establish. Real trouble looks different: wilting that doesn’t recover overnight and persists for several days, leaves going soft and water-soaked rather than dry and limp, a stem base that feels mushy, or blackening travelling up from the crown. Those point to root damage, rot or stem rot from planting too deep, and they need action — usually taking the plant back out and inspecting the roots. I’d add one thing from hard experience: the instinct when a repotted plant wilts is to water it, and that is usually exactly wrong. Wilting after a repot is most often a root uptake problem, and adding more water to a root system that can’t take it up is how you turn shock into rot. Check the mix before you reach for the can.
Big Plants, Broken Pots and Special Cases
Repotting something too big to lift
At a certain size, the method has to change, because tipping a 6-foot plant on its side and rolling the pot isn’t happening. I’ve done this with a rubber tree in a 14-inch pot and lived to tell the tale.
The approach: lay down a tarp or several bin bags first, because you cannot do this cleanly. Slide the pot rather than lift it — a furniture slider, an old towel or a scrap of carpet under the base works, and for stairs I’ve walked a big pot down one step at a time while it stayed upright. Then work on the pot with the plant in place: squeeze or cut the pot away, and enlist a second person to hold the plant upright while you do it. For very large plants, an easier option is a partial refresh — don’t try to remove the whole root ball. Instead, use a hand trowel to take out and replace the top third of the mix, working around the edges, and do it two years running. That gives you most of the benefit of fresh mix with none of the lifting. One caution about going up a size with big plants: each size up in a large pot is a lot more weight, and a 16-inch pot full of wet mix can be genuinely back-breaking. Sometimes the right answer is to root-prune and stay put.
Succulents, orchids and the plants that like being tight
A few groups need their own rules, and repotting them like a pothos is a mistake.
Succulents and cacti want to be dry before you start — don’t water them the day before, which is the opposite of the general rule, because wet succulent roots tear easily and wet mix clings. Let them sit unpotted for a day or two after, so any broken roots callus before they meet moisture. Orchids — the moth orchids most people own — like to be tight and want coarse bark rather than mix, and are usually repotted every year or two purely because the bark has broken down, not because they need more room. Snake plants, peace lilies and hoyas flower better slightly crowded, so only go up a size when the pot is genuinely straining. And a note on safety while you work: several very common houseplants, including pothos, philodendron and monstera, have sap that irritates skin, so gloves are worth wearing, and it’s worth checking anything new against the ASPCA toxic and non-toxic plant list before you bring it home. That’s general plant information and not veterinary advice — I’m not a vet, and no plant list is exhaustive. If a pet or a child actually chews or eats part of a houseplant, call your vet or the ASPCA Animal Poison Control Center at (888) 426-4435 rather than waiting to see what happens.
Troubleshooting: Symptoms, Causes and Fixes
Almost everything that goes wrong after a repot traces back to depth, watering, root damage or timing. This is the table I wish I’d had when I snapped that first pothos.
| Symptom | Likely cause | Fix |
|---|---|---|
| Wilts within a day and stays wilted | Root damage, or planted into dry mix that water ran straight through | Pre-dampen mix next time; water in two passes; give bright indirect light and wait |
| Leaves go soft and water-soaked | Overwatering after a reduced root system | Stop watering; check the mix before each one; let the top 2 in dry out |
| Stem base turning mushy, blackening upward | Planted too deep; crown buried in wet mix | Lift the plant, check the crown is above the mix, trim rot, replant shallower |
| Leaves dropping steadily over two weeks | Normal transplant shock, or too much root removed | Expect some loss; if severe, keep light bright and watering minimal |
| Plant looks unchanged for two months | Repotted out of season, or pot jumped too large | Wait for spring; next time go up only 1–2 in |
| Water runs straight down the inside and out | Dry hydrophobic mix, or a gap between ball and pot | Soak the pot in a basin for 20 min; backfill and firm the sides |
| Fungus gnats a week later | Overwatering wet mix, or gnats came in with the bag | Let the top 2 in dry between waterings; use fresh sealed mix |
| Roots still circling a year on | Outer root mat never loosened at repotting | Next time rake the mat out or make 3–4 vertical slices |
FAQs
How do I know if my houseplant is root-bound?
The most reliable check is to slide it out and look — if you see roots matted against the inside of the pot or growing out of the drainage holes, that settles it. Short of that, the signs I trust are water running straight through the pot within seconds of being poured, the plant drying out within a day or two of a thorough watering, stunted or yellowing new growth, and the root ball pushing itself up above the rim. Two or more of those and it’s worth repotting. One important caveat: a plant can be genuinely root-bound and still look perfectly healthy on top, which is why I lift and check my plants every spring rather than waiting for symptoms. And the opposite matters too — don’t repot just because it’s been a year. If the root ball is fine and the plant is happy, leave it alone.
How much bigger should the new pot be?
Only 1–2 inches wider in diameter than the current one. That’s the single most useful number in this whole process. A plant in a 6-inch pot goes into an 8-inch pot, not a 12-inch one, because roots can only use mix they’re in contact with — a big ring of unused mix around the root ball stays cold and wet, which is how you rot a plant you were trying to help. Going too large also means the plant spends months filling the pot with roots before you see any growth above the surface. For plants already in 12-inch pots or bigger, don’t keep sizing up at all: take the plant out, cut the outer roots back by about a third, and return it to the same pot with fresh mix. And whatever size you pick, make sure it has a drainage hole.
How do I get a stuck plant out without breaking it?
Loosen it rather than pull it, and never pull on the stems or leaves. Water the plant the day before so the root ball holds together, then lay the pot on its side. For a flexible plastic pot, squeeze and roll it firmly all the way around from top to bottom until the ball breaks contact with the wall. For a rigid terracotta or ceramic pot, run a thin knife around the inside edge, pressing against the pot rather than into the roots, then poke carefully into a drainage hole to break the suction at the base. Tip it past horizontal and let gravity help. If it still won’t move, cut the plastic pot off with scissors — pots are cheap and plants aren’t. Hold the plant by the root ball and the base of the stems together, never by the foliage.
Should I loosen or cut the circling roots?
Yes, otherwise the roots keep circling instead of growing out into the fresh mix and the repot achieves very little. For a mildly bound plant, rake the outer mat loose with your fingers and pull it down and outward — that’s usually enough. For a severely bound root spiral, use a clean sharp knife to make three or four vertical slices about an inch deep down the sides, and slice off the bottom inch or two where the coiling is worst. But be conservative: leave the thick structural roots near the crown alone, leave the fine feeder roots in the middle of the ball alone, and never remove more than about a third of the total root mass at once. Sterilize your blade with alcohol first, since ragged cuts invite rot exactly where you can least afford it.
Why is my plant wilting after I repotted it?
Some drooping for a day or two is normal transplant shock and resolves on its own. Persistent wilting is usually a root uptake problem rather than a water shortage: the root system is temporarily smaller than the leaf area it has to support, so it can’t move water fast enough — especially if the plant is in direct sun, which it shouldn’t be for a couple of weeks. The critical mistake here is responding by watering more. Check the mix first; if the top inch or two is still damp, do nothing and wait. Genuine trouble looks like wilting that doesn’t recover overnight and lasts several days, leaves that go soft and water-soaked rather than dry and limp, or a stem base that’s turning mushy and blackening upward — those point to rot or planting too deep, and need the plant lifted and the roots inspected.
Sources and Further Reading
- Missouri Botanical Garden — Plant Finder (species-specific potting and care notes)
- UF/IFAS Gardening Solutions — Houseplants
- RHS — Houseplants
- University of Wisconsin–Madison — Horticulture Program
- ASPCA — Toxic and Non-Toxic Plants List
- ASPCA — Animal Poison Control
About the author
Samantha has been gardening and arranging her own cut flowers for more than ten years, and has built more than 30 centerpieces from grocery-store bunches, clippings off the cedars behind her house, and a handful of dollar-store experiments that didn’t work. She writes practical, low-cost guides for beginners, including the versions that failed. Prices quoted in her articles are what she actually paid at US grocery and craft stores; nothing is sponsored and no brand pays for a mention. She is not a certified florist, a veterinarian or a horticulturist, and says so wherever a topic touches on plant safety or pet health.
Published: Oct 18, 2026 · Last updated: Oct 18, 2026.
{
“@context”: “https://schema.org”,
“@graph”: [
{
“@type”: “Article”,
“headline”: “How to Repot a Root-Bound Houseplant Without Breaking It”,
“description”: “Loosen the root ball instead of pulling, tease or slice the circling outer roots, then replant in a pot only 1-2 inches wider at the same depth and skip fertilizer for six weeks.”,
“image”: [
“https://gmmur.com/wp-content/uploads/sites/5/2026/10/rootbound-hero-clean.jpg”,
“https://gmmur.com/wp-content/uploads/sites/5/2026/10/rootbound-materials-clean.jpg”,
“https://gmmur.com/wp-content/uploads/sites/5/2026/10/rootbound-process-clean.jpg”
],
“author”: { “@type”: “Person”, “name”: “Samantha” },
“publisher”: { “@type”: “Organization”, “name”: “gmmur.com” },
“datePublished”: “2026-10-18”,
“dateModified”: “2026-10-18”,
“mainEntityOfPage”: {
“@type”: “WebPage”,
“@id”: “https://gmmur.com/how-to-repot-a-root-bound-houseplant”
}
},
{
“@type”: “FAQPage”,
“mainEntity”: [
{
“@type”: “Question”,
“name”: “How do I know if my houseplant is root-bound?”,
“acceptedAnswer”: {
“@type”: “Answer”,
“text”: “Slide it out and look: roots matted against the inside of the pot or growing out of the drainage holes settles it. Otherwise, trust water running straight through within seconds, the plant drying out within a day or two of a thorough watering, stunted new growth, or the root ball pushing above the rim. A plant can be root-bound and still look healthy on top, so check every spring.”
}
},
{
“@type”: “Question”,
“name”: “How much bigger should the new pot be?”,
“acceptedAnswer”: {
“@type”: “Answer”,
“text”: “Only 1 to 2 inches wider in diameter. A plant in a 6-inch pot goes into an 8-inch pot, not a 12-inch one, because roots only use mix they touch and a big ring of unused mix stays cold and wet, which rots the plant. For anything already in a 12-inch pot or larger, keep the same pot, cut the outer roots back by about a third and refresh the mix.”
}
},
{
“@type”: “Question”,
“name”: “How do I get a stuck plant out without breaking it?”,
“acceptedAnswer”: {
“@type”: “Answer”,
“text”: “Loosen rather than pull, and never pull on stems or leaves. Water the day before, lay the pot on its side, then squeeze and roll a flexible plastic pot all the way around, or run a thin knife around the inside edge of a rigid pot and poke into a drainage hole to break the suction. Tip past horizontal and let gravity help, or cut the plastic pot off. Hold the root ball and stem base together.”
}
},
{
“@type”: “Question”,
“name”: “Should I loosen or cut the circling roots?”,
“acceptedAnswer”: {
“@type”: “Answer”,
“text”: “Yes, otherwise the roots keep circling instead of growing into the fresh mix. Rake the outer mat loose with your fingers for a mildly bound plant; for a severe root spiral, make three or four vertical slices about an inch deep down the sides and slice off the bottom inch or two. Leave thick crown roots and fine feeder roots alone, never remove more than a third of the root mass, and sterilize the blade first.”
}
},
{
“@type”: “Question”,
“name”: “Why is my plant wilting after I repotted it?”,
“acceptedAnswer”: {
“@type”: “Answer”,
“text”: “A day or two of drooping is normal transplant shock. Persistent wilting is usually a root uptake problem rather than a water shortage, since the root system is temporarily smaller than the leaf area it supports, especially in direct sun. Do not respond by watering more; check the mix first. Genuine trouble is wilting that does not recover overnight, soft water-soaked leaves, or a mushy stem base blackening upward.”
}
}
]
}
]
}